Android tutorial - sqlite android - android app development - android studio - android development tutorial
Android SQLite:
- SQLite is an open-source relational database i.e. used to perform database operations on android devices such as storing, manipulating or retrieving persistent data from the database.
- It is embedded in android by default. So, there is no need to perform any database setup or administration task.
- Here, we are going to see the example of sqlite to store and fetch the data.
- Data is displayed in the logcat. For displaying data on the spinner or listview, move to the next page.
- SQLiteOpenHelper class provides the functionality to use the SQLite database.
SQLiteOpenHelper class:
- The android.database.sqlite.SQLiteOpenHelper class is used for database creation and version management.
- For performing any database operation, you have to provide the implementation of onCreate() and onUpgrade() methods of SQLiteOpenHelper class.
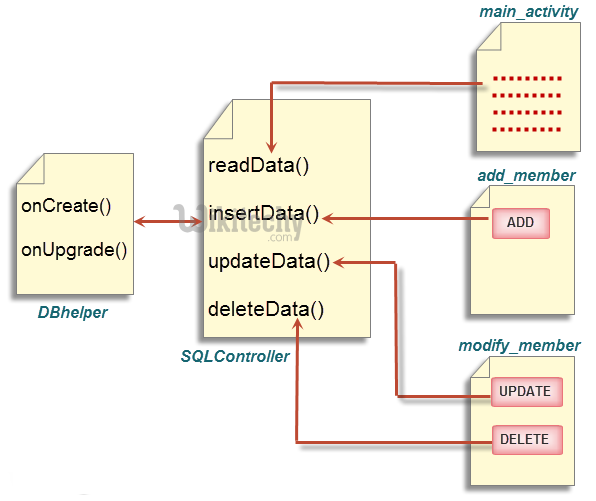
Android Sqlite Example:
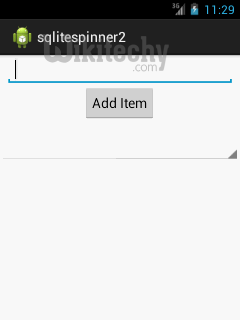
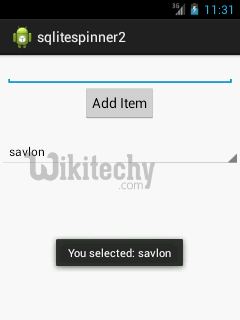
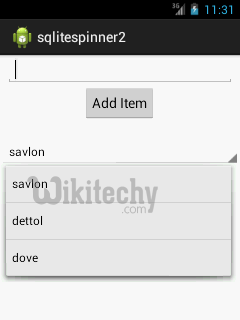
- In this example, we are adding a label on button click and displaying all the added labels on the spinner.
- As you have seen in the previous example, SQLiteOpenHelper class need to be extended for performing operations on the sqlite.
- We have overridden the onCreate() and onUpgrade() method of SQLiteOpenHelper class in the DatabaseHandler class that provides additional methods to insert and display the labels or data.
Android Sqlite Spinner Example:
- Let's see the simple code to add and display the string content on spinner using sqlite database.
activity_main.xml
- File: activity_main.xml
<RelativeLayout xmlns:androclass="http://schemas.android.com/apk/res/android"
    xmlns:tools="http://schemas.android.com/tools"
    android:layout_width="match_parent"
    android:layout_height="match_parent"
    tools:context=".MainActivity" >

     <!-- Label -->
    <TextView
        android:layout_width="fill_parent"
        android:layout_height="wrap_content"
        android:text="Add New Label"
        android:padding="8dip" />

    <!-- Input Text -->
    <EditText android:id="@+id/input_label"
        android:layout_width="fill_parent"
        android:layout_height="wrap_content"
        android:layout_marginLeft="8dip"
        android:layout_marginRight="8dip"/>

    <Spinner
        android:id="@+id/spinner"
        android:layout_width="fill_parent"
        android:layout_height="wrap_content"
        android:layout_alignParentLeft="true"
        android:layout_below="@+id/btn_add"
        android:layout_marginTop="23dp" />

    <Button
        android:id="@+id/btn_add"
        android:layout_width="wrap_content"
        android:layout_height="wrap_content"
        android:layout_below="@+id/input_label"
        android:layout_centerHorizontal="true"
        android:text="Add Item" />

</RelativeLayout>
click below button to copy the code from android tutorial team
Activity class
- File: MainActivity.java
package com.example.sqlitespinner;

import android.os.Bundle;
import android.app.Activity;
import android.view.Menu;
import java.util.List;
import android.content.Context;
import android.view.View;
import android.view.inputmethod.InputMethodManager;
import android.widget.AdapterView;
import android.widget.AdapterView.OnItemSelectedListener;
import android.widget.ArrayAdapter;
import android.widget.Button;
import android.widget.EditText;
import android.widget.Spinner;
import android.widget.Toast;

public class MainActivity extends Activity implements OnItemSelectedListener{
    Spinner spinner;
    Button btnAdd;
    EditText inputLabel;

    @Override
    public void onCreate(Bundle savedInstanceState) {
        super.onCreate(savedInstanceState);
        setContentView(R.layout.activity_main);

        spinner = (Spinner) findViewById(R.id.spinner);
        btnAdd = (Button) findViewById(R.id.btn_add);
        inputLabel = (EditText) findViewById(R.id.input_label);

        spinner.setOnItemSelectedListener(this);

        // Loading spinner data from database
        loadSpinnerData();

        btnAdd.setOnClickListener(new View.OnClickListener() {

            @Override
            public void onClick(View arg0) {
                String label = inputLabel.getText().toString();

                if (label.trim().length() > 0) {
                    DatabaseHandler db = new DatabaseHandler(getApplicationContext());
                    db.insertLabel(label);

                    // making input filed text to blank
                    inputLabel.setText("");

                    // Hiding the keyboard
                    InputMethodManager imm = (InputMethodManager)
                          getSystemService(Context.INPUT_METHOD_SERVICE);
                    imm.hideSoftInputFromWindow(inputLabel.getWindowToken(), 0);

                    // loading spinner with newly added data
                    loadSpinnerData();
                } else {
                    Toast.makeText(getApplicationContext(), "Please enter label name",
                            Toast.LENGTH_SHORT).show();
                }

            }
        });
    }

    /**
     * Function to load the spinner data from SQLite database
     * */
    private void loadSpinnerData() {
        DatabaseHandler db = new DatabaseHandler(getApplicationContext());
        List<String> labels = db.getAllLabels();

        // Creating adapter for spinner
        ArrayAdapter<String> dataAdapter = new ArrayAdapter<String>(this,android.R.layout.simple_spinner_item, labels);

        // Drop down layout style - list view with radio button
        dataAdapter.setDropDownViewResource(android.R.layout.simple_spinner_dropdown_item);

        // attaching data adapter to spinner
        spinner.setAdapter(dataAdapter);
    }

    @Override
    public void onItemSelected(AdapterView<?> parent, View view, int position,
            long id) {
        // On selecting a spinner item
        String label = parent.getItemAtPosition(position).toString();

        // Showing selected spinner item
        Toast.makeText(parent.getContext(), "You selected: " + label,
                Toast.LENGTH_LONG).show();

    }

    @Override
    public void onNothingSelected(AdapterView<?> arg0) {
        // TODO Auto-generated method stub

    }
    @Override
    public boolean onCreateOptionsMenu(Menu menu) {
        // Inflate the menu; this adds items to the action bar if it is present.
        getMenuInflater().inflate(R.menu.activity_main, menu);
        return true;
    }

}
click below button to copy the code from android tutorial team
DatabaseHandler class
- File: DatabaseHandler.java
package com.example.sqlitespinner2;
import java.util.ArrayList;
import java.util.List;
import android.content.ContentValues;
import android.content.Context;
import android.database.Cursor;
import android.database.sqlite.SQLiteDatabase;
import android.database.sqlite.SQLiteOpenHelper;

public class DatabaseHandler extends SQLiteOpenHelper {
private static final int DATABASE_VERSION = 1;
private static final String DATABASE_NAME = "spinnerExample";
private static final String TABLE_NAME = "labels";
private static final String COLUMN_ID = "id";
private static final String COLUMN_NAME = "name";

public DatabaseHandler(Context context) {
super(context, DATABASE_NAME, null, DATABASE_VERSION);
}

// Creating Tables
@Override
public void onCreate(SQLiteDatabase db) {
// Category table create query
String CREATE_ITEM_TABLE = "CREATE TABLE " + TABLE_NAME + "("
+ COLUMN_ID + " INTEGER PRIMARY KEY," + COLUMN_NAME + " TEXT)";
db.execSQL(CREATE_ITEM_TABLE);
}

// Upgrading database
@Override
public void onUpgrade(SQLiteDatabase db, int oldVersion, int newVersion) {
// Drop older table if existed
db.execSQL("DROP TABLE IF EXISTS " + TABLE_NAME);

// Create tables again
onCreate(db);
}

/**
Inserting new lable into lables table
*/
public void insertLabel(String label){
SQLiteDatabase db = this.getWritableDatabase();

ContentValues values = new ContentValues();
values.put(COLUMN_NAME, label);//column name, column value

// Inserting Row
db.insert(TABLE_NAME, null, values);//tableName, nullColumnHack, CotentValues
db.close(); // Closing database connection
}

/**
Getting all labels
returns list of labels
*/
public List<String> getAllLabels(){
List<String> list = new ArrayList<String>();

// Select All Query
String selectQuery = "SELECT  * FROM " + TABLE_NAME;

SQLiteDatabase db = this.getReadableDatabase();
Cursor cursor = db.rawQuery(selectQuery, null);//selectQuery,selectedArguments

// looping through all rows and adding to list
if (cursor.moveToFirst()) {
do {
list.add(cursor.getString(1));//adding 2nd column data
} while (cursor.moveToNext());
}
// closing connection
cursor.close();
db.close();

// returning lables
return list;
}
}
click below button to copy the code from android tutorial team
Output:
