Android tutorial - Toggle Button Android - android app development - android studio - android development tutorial

Learn Android - Android tutorial - Toggle Button Android - Android examples - Android programs
- Android Toggle Button is used to display checked/unchecked (On/Off) state on the button.
- It can be used to On/Off Sound, Wifi, Bluetooth etc.
- Android 4.0, there is another type of toggle button called switch that provides slider control.
- Android ToggleButton and Switch both are the subclasses of CompoundButton class.
- A toggle button allows the user to change a setting between two states.
- You can add a basic toggle button to your layout with the ToggleButton object. Android 4.0 (API level 14) introduces another kind of toggle button called a switch that provides a slider control, which you can add with a Switch object. SwitchCompat is a version of the Switch widget which runs on devices back to API 7.
- If you need to change a button's state yourself, you can use the CompoundButton.setChecked() or CompoundButton.toggle() methods.
Android ToggleButton class
- ToggleButton class provides the facility of creating the toggle button.
XML Attributes of ToggleButton class
- The 3 XML attributes of ToggleButton class.
| XML Attribute | Description |
|---|---|
| android:disabledAlpha | The alpha to apply to the indicator when disabled. |
| android:textOff | The text for the button when it is not checked. |
| android:textOn | The text for the button when it is checked. |
Methods of ToggleButton class
- Some of the widely used methods of ToggleButton class is given below,
| Method | Description |
|---|---|
| CharSequence getTextOff() | Returns the text when button is not in the checked state. |
| CharSequence getTextOn() | Returns the text for when button is in the checked state. |
| void setChecked(boolean checked) | Changes the checked state of this button. |
1. Custom String
- Open “res/values/strings.xml” file, add some custom string for toggle buttons.
- File : res/values/strings.xml
<?xml version="1.0" encoding="utf-8"?>
<resources>
    <string name="app_name">MyAndroidApp</string>
    <string name="toggle_turn_on">Turn On</string>
    <string name="toggle_turn_off">Turn Off</string>
    <string name="btn_display">Display</string>
</resources>
click below button to copy the code from android tutorial team
2. ToggleButton
- Open “res/layout/main.xml” file, add two “ToggleButton” and a normal button, inside the LinearLayout.
- File : res/layout/main.xml
<?xml version="1.0" encoding="utf-8"?>
<LinearLayout xmlns:android="http://schemas.android.com/apk/res/android"
    android:layout_width="fill_parent"
    android:layout_height="fill_parent"
    android:orientation="vertical" >

    <ToggleButton
        android:id="@+id/toggleButton1"
        android:layout_width="wrap_content"
        android:layout_height="wrap_content"
        android:text="ToggleButton" />

    <ToggleButton
        android:id="@+id/toggleButton2"
        android:layout_width="wrap_content"
        android:layout_height="wrap_content"
        android:textOn="@string/toggle_turn_on"
        android:textOff="@string/toggle_turn_off"
        android:checked="true" />

    <Button
        android:id="@+id/btnDisplay"
        android:layout_width="wrap_content"
        android:layout_height="wrap_content"
        android:text="@string/btn_display" />

</LinearLayout>
click below button to copy the code from android tutorial team
3. Code Code
- Inside activity “onCreate()” method, attach a click listeners on a normal button, to display the current state of the toggle button.
- File : MyAndroidAppActivity.java
package com.wikitechy.android;

import android.app.Activity;
import android.os.Bundle;
import android.view.View;
import android.view.View.OnClickListener;
import android.widget.Button;
import android.widget.Toast;
import android.widget.ToggleButton;

public class MyAndroidAppActivity extends Activity {

  private ToggleButton toggleButton1, toggleButton2;
  private Button btnDisplay;

  @Override
  public void onCreate(Bundle savedInstanceState) {
	super.onCreate(savedInstanceState);
	setContentView(R.layout.main);

	addListenerOnButton();

  }

  public void addListenerOnButton() {

	toggleButton1 = (ToggleButton) findViewById(R.id.toggleButton1);
	toggleButton2 = (ToggleButton) findViewById(R.id.toggleButton2);
	btnDisplay = (Button) findViewById(R.id.btnDisplay);

	btnDisplay.setOnClickListener(new OnClickListener() {

		@Override
		public void onClick(View v) {

		   StringBuffer result = new StringBuffer();
		   result.append("toggleButton1 : ").append(toggleButton1.getText());
		   result.append("\ntoggleButton2 : ").append(toggleButton2.getText());

		   Toast.makeText(MyAndroidAppActivity.this, result.toString(),
			Toast.LENGTH_SHORT).show();

		}

	});

  }
}
click below button to copy the code from android tutorial team
4. Demo - android emulator - android tutorial
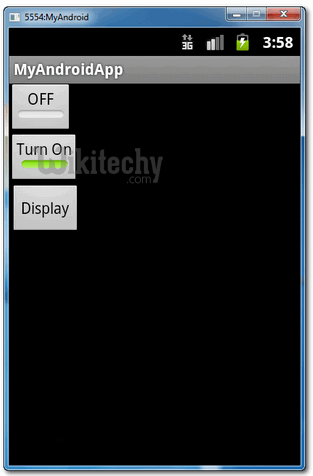
- Run the application.
- By default, toggleButton2 is using the customized string, and its checked.
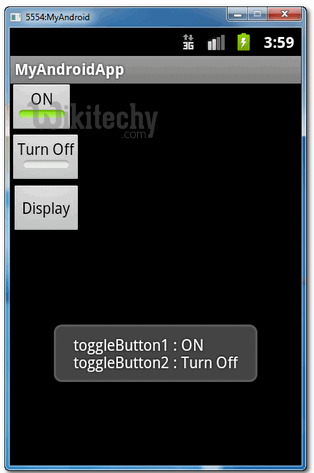
- Checked toggleButton1 and
- unchecked toggleButton2, and click on the display button,
- the current state of both toggle buttons will be displayed.